 | |||
 |
 |  | |
 |  | ||
 |  | ||
 |  | ||
 |  | ||
 | |||
 |
 |  | |
 |  | ||
 |  | ||
 |  | ||
 |  | ||
| Written by Paul D. Race and Howard Lamey for HalloweenTrains.com(r) |
|
|
Note from Editor: This project is another in our Tribute to Tinplate(tm)" series, a tribute to the tinplate villages that were served by tinplate trains in the early 1900s. Like the original Building Tinplate Storefronts project, this project was inspired by a series of candy containers that were made in the early-to-mid 1900s by West Brothers. Each container included a glass full of candy that you could see through the house's "windows." A photo of the one of the original tins is at the left. Note: This is Paul - Howard was out of town when I came up with the graphics in this article, but I wanted to get them published in time to give people a chance to build these for Halloween. So I "borrowed" his instructions from a similar project. I hope you don't mind. If you sign up for our Trains-N-Towns(tm) newsletter, we'll let you know when we create and upload more storefronts or other projects you might find helpful. Build Halloween-Themed, Tinplate-Inspired StorefrontsAfter Paul and I started creating our first Tribute to Tinplate(tm) buildings, we both started combing the Internet for photographs of worthwhile projects. Once we got started with storefronts based on the West Brothers' candy boxes, it wasn't hard for Paul to keep imagining new versions. I suspect that he may eventually have a set for every major holiday, which would be even more justification for leaving your holiday village or train set up all year long.What You Will Need
A Note about ScaleAlthough my Marx trains run on O gauge tracks, they are closer to S scale (1:64), the scale of S gauge American Flyer trains, and many collectible village houses. So I chose that scale to build these projects for indoor railroaders.New for 2014 - Paul has added graphics that will work with Large Scale (garden trains), which makes them ideal for any outdoor Halloween-themed setups you want to do. We haven't upsized the plans, but if you print one of the Large Scale versions on a B&W printer to save toner, you should be able to use that to size your structures. Pay attention to the fold lines, though. Everything beyond those are there to provide a tad more graphic in case your structure isn't quite the right size or isn't quite square. Print the PatternsThis project has a structure pattern that you will need to cut out and transfer to cardboard, as well as graphic sheets that you will use to finish the building's appearance.Note: For this project, we have provided the patterns in S scale, the scale we used for this project. You may print the structure pattern on any sort of paper, since you're simply using this to transfer the plan to your cardboard medium. However the "lithograph" graphic should be printed on acid-free heavy paper or card stock. Note that Plans 1a and 1b are meant to be spliced together before you transfer the pattern to the cardboard. For Optimum Printing - For the lithographic "wrap," we have used professional "vector" graphics when possible, to make certain that you get the highest resolution graphic, whatever scale you use. In most cases, you can get the best result by right-clicking on the name of the graphic you need, then saving the pdf file to your hard drive. (That way if you accidentally print them at the wrong size, which is very easy to do on some printers, you don't have to download them again.) Then navigate to the folder where you saved the files and click on the file name. Adobe Acrobat Reader should open up. Make certain that the graphic is set to print at 100% ("scale to fit" or "fit to page" should not be checked). Structure Patterns
Store Front GraphicsTo help you decide which building to start with, I've supplied medium-resolution jpeg versions of the building faces. If you click on the little thumbnail, you'll see a version big enough to see clearly. However for the actual project, please download the zip files from the text boxes below the thumbnails. Each file includes all four sides of the building in pdf format.
Tar Paper/Flat RoofThese patterns are from another feature, so you'll have to trim them to size after you download them. Though I like the staggered pattern best, I did one of each of these, just for variety. Which one or ones you use is entirely up to you. It was common on tinplate structures to change up even the insignificant patterns when redrawing the graphics, so don't worry too much about consistency.
If you can't get the graphics to work the way you need them to, contact
Paul and ask him for help - that's his department. :-)
A note about Copyright - However you use these plans and graphics for your personal use, please keep in mind that the lithograph-style graphics are copyright 2013 by Paul Race and are not to be copied, re-used, republished, or repurposed without prior permission and appropriate credit. Commercial use without prior permission is illegal and expressly forbidden.
Building a "Mockup"You will save time and sanity in the long run if you print the graphics in low-res B&W first to make certain that the are the right size for the plans you have printed out and that they are the right size to go with the rest of your equipment.Remember, when you score and fold the frame pieces, the "fold lines" of the graphics should be a tad wider in each direction than the pieces you cut out, because you need to compensate for the thickness of the cardboard you are using. Paul's wall graphics also extend the wall pattern beyond the fold lines to compensate for any minor differences. The best way to be sure you have plans in the same scale as your graphics is to fold the graphics along the fold lines, then cut them out and hold up to the frame pieces. Again, the frame should be slightly smaller, especially horizontally. If it isn't, adjust the size when you transfer the plans to the card stock. Cutting and Scoring the Frame Pieces Once you have transferred the plans to the cardboard you will use for a frame, use a Xacto-type knife and a straight edge to carefully score every place where a fold is indicated. Then cut the pieces out and fold them into a square. Once you have transferred the plans to the cardboard you will use for a frame, use a Xacto-type knife and a straight edge to carefully score every place where a fold is indicated. Then cut the pieces out and fold them into a square.
Now it's time to temporarily fold the B&W graphics around the walls as a "sanity" check. If it helps you to actually put one together this way, go for it. Engineers have a saying "build one to throw away, you will anyhow."
Building the BaseIt was my idea to make the "sidewalk" in front of the building into a "boardwalk." This will eventually give you a very nice place to set figures, fire hydrants, lamp posts, and the like.I made the base by laminating two pieces of the thin corrugated cardboard from Express Mail packages. You could laminate "matte" cardboard as well. The foundation should fit loosely inside the four sides of the building once it is assembled. Eventually, it will give you more surface for gluing the building down to the base reliably. That said, you don't want to glue the foundation to anything until the building is complete and you have checked the fit one last time. Building the Crest and Support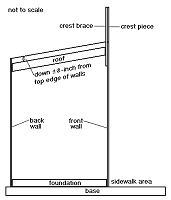 Technically, I could have made each storefront from one big piece of cardboard, including room for the "crest." As it turned out, it was easier for me to build the crest separately and fasten it onto the building front after I had the four walls glued together. I also added an extra layer of support to the crest, since it would be sticking out and more prone to "bumping." Plan 3 shows a side view of how I layered these pieces. Technically, I could have made each storefront from one big piece of cardboard, including room for the "crest." As it turned out, it was easier for me to build the crest separately and fasten it onto the building front after I had the four walls glued together. I also added an extra layer of support to the crest, since it would be sticking out and more prone to "bumping." Plan 3 shows a side view of how I layered these pieces.
By making three of these at the same time, I could work on one while the other one was drying, and so on. Let the building frames dry at least overnight before you start applying the graphics - the last thing you need is a joint popping or the frame getting wobbly while you're trying to be precise with the graphic. Applying the GraphicsThen I carefully applied the graphic wraps to one wall at a time. Note: For the following illustrations, we are supplying photos of another building project that uses the same basic patterns. Please don't let the different colors and signage on the graphics confuse you. I started on the sides, then did the back and front. I could have started with the back just as easily, but the front definitely has to come last.
Spread a thin layer of glue over the entire wall to be glued, and along the edges where the extra bits will wrap around the corner. Then fasten the graphic down carefully. Consider using clothespins or the like to make certain the wrap doesn't shift during the drying process. Once the first "wall" has dried, you add the next wall, except that one of your "fold lines" on the next wall should actually be a "cut line" if your graphic pages are fitting where they need to be.
Because I didn't cut the crest's shape out ahead of time, the building's crest looks a little funny at first. I could have cut it out, I suppose, but then I'd have an extra variable while trying to align the graphic for the store front with the left and right edge. Or worse yet, I'd discover that I had cut the crest shape wrong and have to start a building all over again. Trimming the CrestWhen the glue for the front has dried completely (meaning overnight at least), use a very sharp Xacto-style knife to trim the crest to match the shape of the graphic. Don't rush this job or try to cut all the way through both layers of cardboard on the first pass. Instead, make many light passes.
Applying the RoofOnce you have the structure glued together and all graphics applied, cut out a piece of corrugated cardboard or foam core to fit just inside the walls. Choose and apply a roofing pattern, and when it is completely dry, fasten the roof in place. I fastened mine about an 1/8" down from the side and back walls. I actually applied the glue from inside the building, then brushed it into the seams where the roof fit the walls.Touch Up the Cut LinesWhen all the graphics are applied, take a marker or fine-tipped brush and touch up the edges of the cut graphic media with a color that is compatible with the siding color.Assemble the StructureOnce you have tested all of the fits, it's time to glue your structure(s) together. Double-check the fit of the foundation inside each building, then glue it onto the base. I'd give it a few minutes to set before gluing the building down on top of it. Again, the hurry-up-and-wait aspect of this stage of the project is reduced if you are working on two or three buildings at once.FinishWait until the graphics, paint, and glue are thoroughly dry (at least overnight, if not 48 hours), then spray the structure(s) with several light coats of a clear glossy indoor/outdoor acrylic finish. This protects the surfaces from moisture and dust and also helps reduce fading. In addition, it makes the lithography pattern "pop." Do not spray such a heavy coat in one pass that you cause any streaks, runs, or drips, though, or you'll have to start all over. Of course the structures will really come to life when you add accessories and put them into some sort of setting, even a simple one. ConclusionIf you like this project, stay in touch - more are on the way. In the meantime, you might like to take a look at the following projects.
Other Articles about cardboard houses include:
To Return to the Halloween Trains and Towns(tm) Primer Page, click here. To Return to the BIG Indoor Trains(tm) Primer Page, click here. |



|

|

|  |
 |
 |  |  |
Note: Family Garden Trains?, Big Christmas Trains?, Big Indoor Trains?, Big Train Store?, and Trains-N-Towns? are trademarks of Breakthrough Communications? (www.btcomm.com). All information, data, text, and illustrations on this web site are Copyright (c) 1999, 2000, 2001, 2002, 2003, 2004, 2005, 2006, 2007, 2008, 2009, 2010, 2011, 2012, 2013, 2014 by Paul D. Race.
Reuse or republication without prior written permission is specifically
forbidden.
Halloween Trains(tm) is a participant in the Amazon Services LLC Associates Program, an affiliate advertising program designed to provide a means for sites to earn advertising fees by advertising and linking to amazon.com.
For more information, contact us.
 |  |
