|
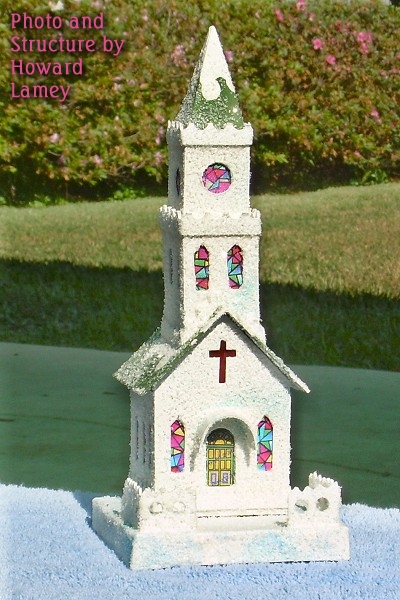
Note from Editor: Howard Lamey, in Jacksonville, Florida, has an artist's eye for proportion and charm. He also has the good taste to be one of my readers. I met Howard online when he told me he had used a stained glass pattern from our Free Graphics Resource Page pattern on a vintage-style cardboard church he had built.  Howard has retired from a full-time job in advertising that included designing window displays for a major retailer. Now he has turned those artistic talents to designing and building vintage-style cardboard buildings for his family and friends. When I saw the Halloween house featured in this article, I begged him to tell us how he did it, and now we have the chance to share with you. Since this article was published, we have added many more articles on building small cardboard holiday houses, and Howard keeps sending me new photos and plans faster than I can get them published, so stay tuned. Howard has retired from a full-time job in advertising that included designing window displays for a major retailer. Now he has turned those artistic talents to designing and building vintage-style cardboard buildings for his family and friends. When I saw the Halloween house featured in this article, I begged him to tell us how he did it, and now we have the chance to share with you. Since this article was published, we have added many more articles on building small cardboard holiday houses, and Howard keeps sending me new photos and plans faster than I can get them published, so stay tuned.
Building a Vintage-Style Cardboard Halloween House
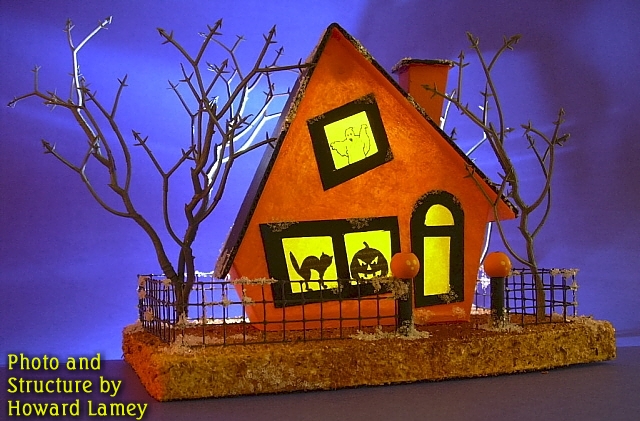
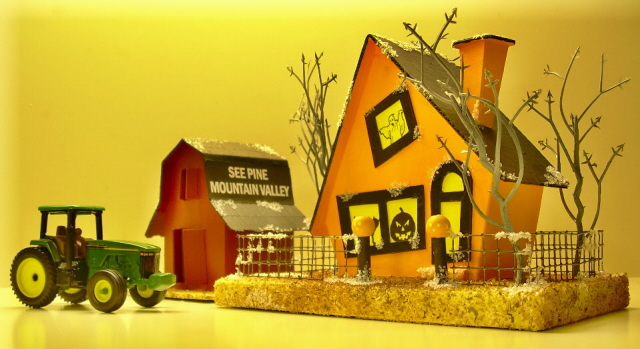
Paul has asked me to tell you how I made the building that shows in the title photo. It's a "family-friendly" Halloween house that will eventually be part of a village for my grandchildren.
What You Will Need
If you are going to build cardboard houses, stop throwing away used, clean cardboard yesterday. Save cereal boxes, the backs of writing tablets, anything flat, firm and clean, that you can save. This pattern doesn't require any corrugated cardboard, but it wouldn't hurt to keep some of that on hand, too. In addition, for this project you'll need:
- A sharp mat knife or Xacto knife
- Elmer's white Glue-All. A glue stick would also come in handy.
- About a cup of sawdust
- Clear glitter
- A sheet of yellow bond paper (well, two sheet in case you mess one up)
- Several sheets of acid-free white bond paper
- Orange, black, and beige acrylic paint
- Some means of spraying brown, dark green, orange, and yellow. This could be paint cans, or a spray bottle you can use with acrylic paints.
- Floral picks from artificial flowers with the flowers removed for the trees (optional)
- A few square inches of hardware cloth for the fence (optional)
- Two wooden pegs with round ends for the fence post (optional). I believe they're called "loom pegs." You can get these at most craft supply stores.
- Access to silhouette images of a ghost, cat, and jack-o-lantern. (Alternatively, if you have a computer printer, you can print the graphics Paul has supplied us with.)
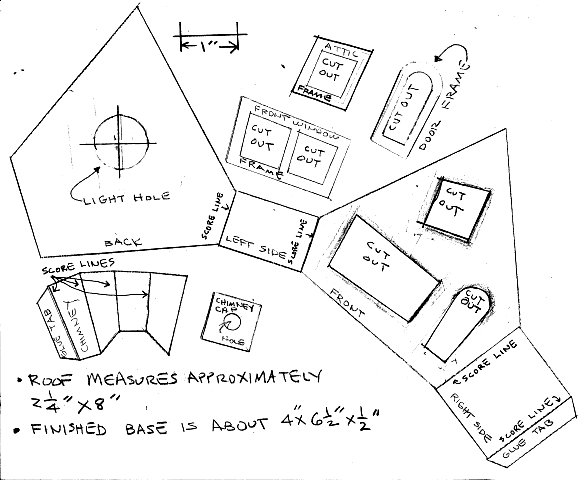
Printing the Plan
Double-click on the plan above to see a blow-up. You should be able to print the big version at the size you need.
- If you have Adobe Acrobat Reader on your computer, click here to open the pdf version. Select the print option, tell it to "auto rotate and center" or whatever else you need to make it go to Landscape mode. Don't select the "scale to page" or "shrink to fit" option. Print.
- If you don't have Adobe Acrobat Reader on your computer or for some reason that doesn't work, open the big JPG version. Choose the "file, page setup" from your browser. When the page setup menu comes up, select "landscape mode." You should also choose the "print to fit" option if you have one. If you don't have a "print to fit" option, you may have a margin setting option. Set the margins to 1/4" if you can and print.
If neither of those work, contact
Paul and ask him for help - that's his department. :-)
Building the Base
The base is a rectangular "box" that is decorated before the house and trees are installed. It should be about 4" x 6 1/2" x 1/2". - You may form the box either of two ways:
- Built-Up Box Method - You may form the base from thin cardboard like posterboard or the cardboard from a cereal box. Build it like a department store �gift box� with a lid. Place layers of scrap cardboard inside the box to keep the box from caving in when the house, fence and trees are added.
- Corrugated Cardboard Method - Alternatively, you could make a base from layers of corrugated cardboard glued together in a sandwich. If you choose this method, you will then wrap and glue a strip of cereal-box cardboard all around it to camouflage the rough edges of the corrugated cardboard.
- When the base is built, you then cover it with white bond paper just like you would wrap a gift, except that all surfaces of the paper cover must be glued down to the box. A glue stick works great for this.
Note: For more information about building bases for vintage-style cardboard houses, please see our Glitterhouse Bases article.
- When the glue has dried, paint it with an acrylic beige.
- Spread the Elmer�s Glue-All over the top and sides of the base and sprinkle sawdust over it. Press the sawdust into the glue a little and make sure there aren't any major "holes" in coverage. Then set the base aside and allow it to dry.
- "Mist" the sawdust with brown, dark green, orange and yellow spray paint in a random pattern. The house, fence and trees are not glued on to the base until the base is finished.
Prepping the Structure Pieces
- The house, chimney, and chimney cap (and the roof, eventually) need to be cut from thicker cardboard, such as the cardboard from the back of a writing tablet.
- Layout the lines carefully.
- Using a steel-edged ruler as a guide, cut out the shapes with a sharp mat knife or X-acto knife. Watch your fingers.
- Score all fold lines.
- Cut the roof from the same cardboard as the house. It should be about 2 1/4" x 8". The most important thing is that it has an overhang on all sides just like a real house. After you determine where the peak of the roof should be, score the crease.
- Cut the door and window frames from thinner stock, such as posterboard or cereal box cardboard.
- Locate silhouettes of a ghost, cat, and Jack-o-lantern and print them on yellow bond paper. I got mine from an Internet search. If you want, you can print off the ones that Paul located. Don't use the "resize to fit" option when you print, or you'll get something way too large to use. (If you try Paul's and it comes up the wrong size, download the JPG version and resize it as necessary on your computer.
Assembling and Painting the House
- Assemble all the building pieces with Elmer�s white Glue-All.
- Prime all surfaces with flat white paint.
- Paint the primed and assembled house.
Prepping the Scenery
The fence is made from �-inch hardware cloth. Cut and fold it to the shape you need and paint it black.
If you can get loom pegs from the craft store, you can paint the lower part black, then paint the round tops orange and put tiny jack-o-lantern features on them.
For trees I used floral picks that have a branch-like structure that provides a dead tree look. The little "barbs" on the end of the branches are even acceptable for a Halloween house. If the floral picks you use aren't black, brown or gray, you may have to spray them. You'll also have to cut the trunk to the appropriate length, probably with a pair of wire cutters. Eventually you make holes in the base and glue the trunks into the holes. Note: If you want to make freestanding "dead trees" from floral picks, please check out our cleverly titled article "Winter Trees from Floral Picks".
When everything is glued together and the glue has dried, add little touches of frost on the roof, chimney, fence, and base. I use clear glitter sprinkled over Elmer�s Glue-All.
Concluding Thoughts
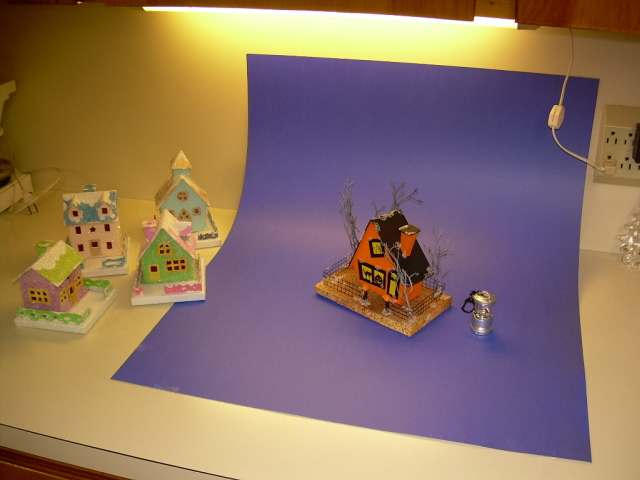
Here's a day shot, a night shot and a pix of my "photo studio"...

Since making these houses, I have added a yellow moon with a witch on a broom
silhouette...the moon is mounted on a black bamboo skewer and is stuck in the
base behind the chimney...it added a lot to the scene...
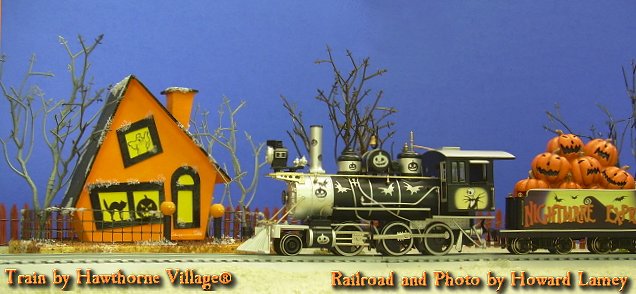
Using With Trains - A few months after I built this, Paul sent me a Hawthorne Village "Nightmare Before ChristmasTM" locomotive and a few cars. He wanted to give readers a sense of how this and the other Spook HillTM buildings would look with a commercial Halloween train. (This train and others are described on Paul's Halloween Trains web pages. 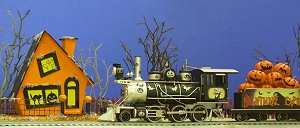 Except for the holiday paint job, this train is actually an On30 model compatible with Bachmann's On30 trains, which were designed to look good with Christmas villages. Most HO trains would be a little smaller, and most Lionel trains would be a little bigger, so this should give you a pretty good idea of whether it will work with your train set. Except for the holiday paint job, this train is actually an On30 model compatible with Bachmann's On30 trains, which were designed to look good with Christmas villages. Most HO trains would be a little smaller, and most Lionel trains would be a little bigger, so this should give you a pretty good idea of whether it will work with your train set.
Update for April, 2008
 This building was so popular that we have has started a whole collection called Spook HillTM.
These cardboard vintage-style Halloween building project are perfect for giving your mantle, or your HO, On30, S, or O-gauge railroad a special bit of Halloween cheer. The link to the right will take you to the first of a series that Howard has already developed. We guarantee these projects to be entirely unique. In fact, I don't think there's another resource like this anywhere on the Internet, and that's a pretty big place.
This building was so popular that we have has started a whole collection called Spook HillTM.
These cardboard vintage-style Halloween building project are perfect for giving your mantle, or your HO, On30, S, or O-gauge railroad a special bit of Halloween cheer. The link to the right will take you to the first of a series that Howard has already developed. We guarantee these projects to be entirely unique. In fact, I don't think there's another resource like this anywhere on the Internet, and that's a pretty big place.
Now For a Little Business
Now that I'm in "retirement," this hobby has become a sort of avocation for me. Several folks have commissioned me to build specific houses for them. I've put up my own site, LittleGlitterHouses.com. So if you'd like me to "bid" on a cardboard house for you, or if you have any questions at all, please visit my site or use this link, and Paul will forward your information to me.
Also, if you have a similar project you'd like to share with your fellow readers and hobbyists, we'd love to add it to our site, and we'll be sure to give you full credit for your contribution.
Other Articles about Glitterhouse include:
Other Putz House Resources:
- LittleGlitterHouses.com - Putz house builder Howard Lamey now has his own site, begun in December, 2007. You can commission your own custom-built glitterhouse, or buy a precut kit and finish it yourself.
- "Papa Ted's Place" Ted Althof's extensive resource about vintage pasteboard houses. Includes some history, many photos from other people's collections, and resources to help you build your own. The links below will take you right to the approprate page on "Papa" Ted's site. You'll find lots of other pages to look at while you're there, though.
- Aimee Gomberg's original putz houses - unique collections for sale.
Other Articles that Discuss Putzes and Christmas Villages of the mid-20th Century:
- About Nativities - Describes how German-American Nativity displays (the original "putzes") grew into communities and landscapes that included pastboard, glittered houses and even electric trains.
- What Do Trains Have to Do With Christmas - Describes how electric trains contributed to the communities many families set up at Christmas, with some details about the elaborate "Christmas Gardens" of the Baltimore/DC area.
- Author Antoinette Stockenberg's home page - includes photographs and comments on putz houses and life in general.
To Return to the HalloweenTrains(tm) Primer Page, click here.
|
|