 | |||
|  |  | |
 |  | ||
 |  | ||
 |  | ||
 |  | ||
 | |||

|  |  | |
 |  | ||
 |  | ||
 |  | ||
 |  | ||
Written by Paul D. Race for  and and  |

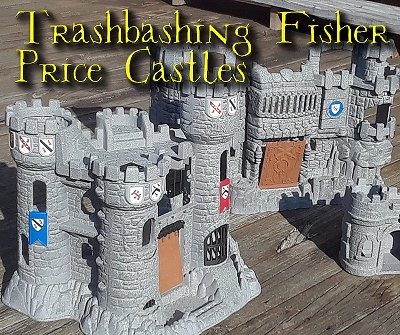
| Trashbashing Fisher Price CastlesWhether you have a railroad or an oversized fairy garden, or just a bent for fantasy, you might like to take a look at the way we adapted three toy castles to make our Hogwarts Express train look at home for young visitors. We chose used/abused Fisher Price castles for the starting point, then applied lessons we had learned trashbashing other toy structures over the years.What is Trashbashing?Model railroaders have long used the term "kitbashing" to describe making a model by taking parts from another model or two. Fortunately, Fisher Price and Playskool had been making buildings that were roughly proportioned like North American buildings and were even pretty close in scale to my trains. No, I didn't buy new ones - I scrounged $1-$2 battered sets at garage sales and thrift shops.
Thirty-odd years on, very few toy companies are making anything that would stand in for a model building - everything is exaggerated for "shelf appeal." So the art of "trashbashing" may be doomed in the long run, but a recent project project got me interested in trashbashing something I had yet to attack - a castle. Hogwarts Express and Open RailroadsWhy a castle? Since 2008, we have had an annual Christmas-themed open railroad (minus 2016 and 2017 because of a move). They always include sets the kids are allowed to run, usually the Lionel battery-powered sets described in this article.This year I considered using a battery-powered train Lionel made several years ago to represent the Hogwarts Express in the Harry Potter movies. (Set #7-11080, which runs on G gauge track, not to be confused with the newer set #7-11960, which runs on "special track" that only Lionel makes at this time.) Though the set came with only two coaches, I had picked up another two. Except for being too small to look right beside my model trains, it looked and ran great on my G gauge track. 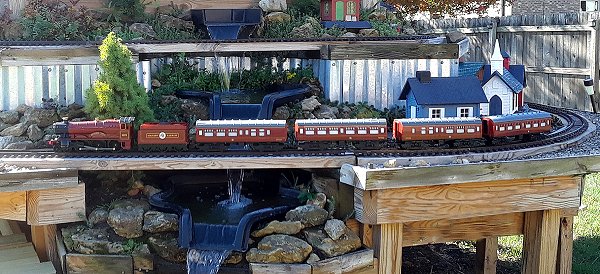 Then we spent five days at Universal Studios in Orlando, getting to know the "Wizarding World of Harry Potter" features pretty well. Including the Hogwarts Express, which we rode several times. We also admired the Hogwarts castle. You can't actually see inside it unless you're in line for one of the rides, but from outside, it is very impressive.
At the same time, I thought it would be nice if - for the open railroad - we could have a castle for our own Hogwarts Express train. I examined many sources, including an article about the huge As it turns out, nobody makes a model of Hogwarts that is anywhere near the right scale for my trains. The closest one is the Lego kit #7043 which costs "real money," would take massive amounts of time I don't have to assemble, and isn't suitable for outside at any rate. Yes, they make smaller sets, like the Great Hall set, but I still think that would demand too much money and time for something I would be leaving outside for a week or so of bad weather. I began looking at Hogwarts' design critically. What would it take to get a reasonable representation in anything close to Large Scale. The answer was that it couldn't be done on my budget and in my timeframe. And I might want to use anything I built - like a castle - for something else eventually. So I took time to consider what I could afford to create in the time I had. Fisher Price to the rescue once again. Fisher Price CastlesOver the years, Fisher Price has made several castles. Our kids had one of the first - the partially cardboard 1974 issue (though it was already well-used before they got it some twenty years later).Between 1994 and 1997, Fisher Price made the all-plastic version (#7110) that you can see in the back of the following photo. It's actually the most realistic of the three I'm using for this project, even though mine is missing pieces, including the built-in cannon. I got mine for nine cents at a thrift shop, and I passed up one with the cannon for $4.50 a few days after I started this project. Perhaps I should point out that none of my thrift-shop castles had any of the accessories. In the photo below, I have peeled most of the stickers off and removed the goo, plus cleaning the dirt and grime off the structures with an ammonia-based cleaner. 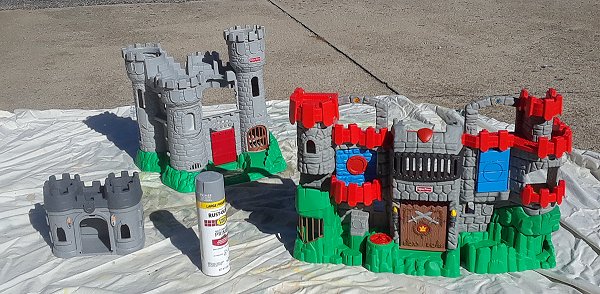 The big orange and green castle that folds out is the Imaginext Adventures Castle (#J5099), which is more recent, though it it is no longer made. I got mine for $3 at a thrift shop and passed up another one a few weeks later for the same price. It is far less realistic than the 1994 castle, but I plan to use it mostly in the background. (You can see what I mean about designing for shelf appeal versus realism.) The little castle is a Play and Go castle (#1519?), which is also discontinued. Mine is missing not only the accessories, but also the door/drawbridge. I bought it for $1 at a thrift shop a couple years ago with the intention of maybe using it in a fairy garden or some such. Amazon scalpers are now trying to get between $70 and $100 for the SAME structures you see in the photographs (even the little bitty one), with few or none of the accessories. Ebay sellers are selling the same things fairly cheaply but charging up to $70 for shipping, so just remember - trashbashing is a "waiting game." Thrift shops, flea markets, and garage sales are your friends. In addition, Fisher Price has made several other castles, and other companies like Playmobil have made some great ones. These three are just examples to show what is possible with a few dollars' worth of broken toys. Priming and MaskingFrom the start of this project, my intention was to prime and paint these in such a way that they could be left outside for a few weeks a year without the paint coming off or the plastic turning brittle. As noted in our article "Painting Plastic Structures," at least two coats of UV-resistant finish are required to keep plastic buildings from fading and turning brittle outdoors. The first coat is always an opaque primer, be it gray or "red." I primed every side of the castles, including multiple coats on the sides that would show. That used up my can of primer, but experience tells me it's a worthwhile investment.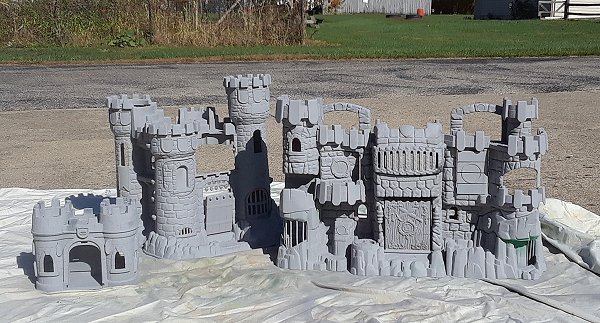 As you can see, having the same color on all three buildings is already starting to make them look better together. Next I masked the places where I would be applying my own stickers (see below) or hand-painting. This included the doors, some of the bars, and all the shield-shaped parts on the #7110 castle. Originally those had little coats-of-arms, and I planned to replace them with coats-of-arms from our family. 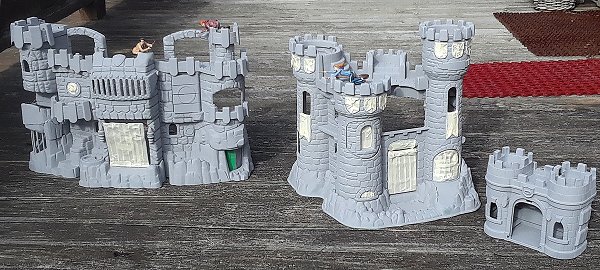
I expected cheap hollow plastic. Instead they're solid rubber like the best toy figures we had when we were kids. They're a little too big, technically, for Large Scale, but I think they'd look great dangling above the castles. Also, they have almost invisible holes in their bellies, presumably because they came with little stakes that would raise them above a birthday cake. They have a WB (Warner Brothers) trademark and the manufacturer's name Bakery Crafts imprinted on their thighs, presumably by using one of Professor Umbrige's magic pens. Trying to establish a date on them, I ascertained that the trio's clothing is based on their appearance in the last movie, and the image of Hermione flying a broom is taken more or less from the scene in which they're escaping the fiendfyre in the Room of Requirement. The rubber Hermione is wearing the Diadem of Ravenclaw, which she never did in the movie, though. (She would have had more sense). No you didn't need to know all that, I just went down a "rabbit hole." I have only seen one other set for sale (on eBay) and they want much more than I paid. Again, patience is a virtue. Time to Rock!
The masking shown above was meant to protect parts that needed to stay smooth, mostly where I would be painting a different color or attaching stickers. I applied the paint in several light layers, trying to get a very even coat on the parts that would be most apparent to viewers. The photo below shows them after the first coat. 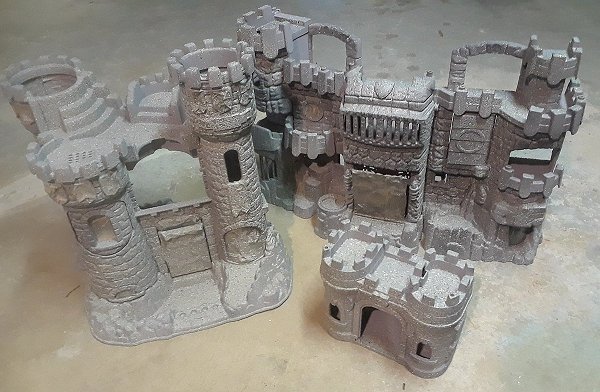 Spoiler Alert!I'm going to temporarily jump ahead a month and tell you that, while the "stone" castles looked great on my garden railroad, and I attempted to protect the finish by two coats of clear, weather-resistant finish, the fake rock finish began washing away by the third rainstorm - in contrast to many structures I have painted that looked good left after being left outside for years. In other words, if you're going to use such structures outside, please find another way to finish them. The wargamers have some great weathering techniques that could be adapted.In the meantime, I've gone to storing these inside and only bringing them out when we have visitors. Adding HeraldryBecause the #7110 castle had places for coat-of-arms stickers, I could have found shields that represented each of Hogwarts' houses. But instead, I did some digging into our family names to see if I could come up with something more personal.
When I was out of the spray finish, I let the buildings dry overnight, then peeled off the masking tape. You can clearly see where I plan to put the little shield stickers on the #7110 castle. I had also masked the door/drawbridge, the little portcullis (the bars above the door/drawbridge), and bars on two other sections. On the J5099 castle, I had only masked the door and one circular area. You can see those at the left of the photo. You can click the photo to see a bigger version if that would help you see it more clearly.
I printed them with a color laser on full-sheet waterproof labels from Online Labels.com. If you do a project like this and use an inkjet or paper, be sure to protect the paper with multiple coats of VERY light UV-resistant transparent spray. (If you saturate them in the first spray, the ink can run, no matter what the printer vendors say). I planned to paint the doors brown and the bars black. I had no real plan for the long vertical banners hanging out of the windows on the #7110 castle. If I'd REALLY had it together, I'd have made a sticker for those, too. As it is, I had already printed out two sheets of stickers, one with the curved bottoms and one with the pointed bottoms. I wound up painting the banners a solid color. Then I used pointed shield stickers to decorate those and a few other places on the castles. 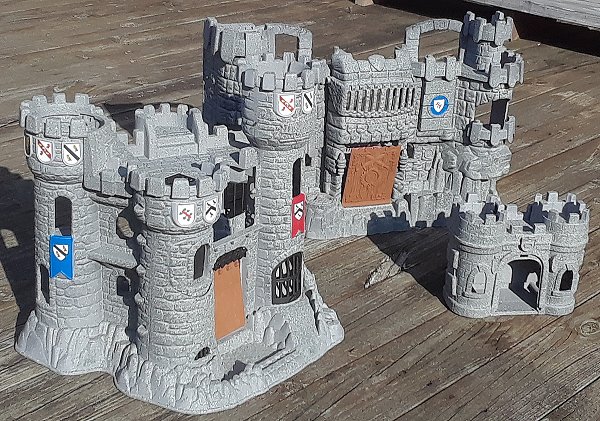 After taking them outside for the photo above, I brought them back to the basement to receive a UV-resistant flat clear coat. Just as well, because in a couple of days we got 4 inches of snow! The following photo shows them on the platform where they will be placed for our open railroad on Nov. 16, 2019, along with the G gauge Lionel Hogwarts Express #7-11080 that will be circling it. This was after I swept most of the snow off the platform, of course. 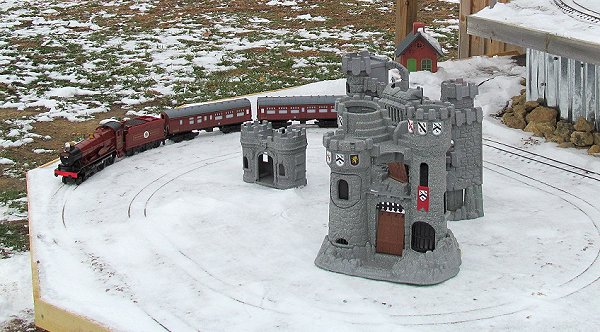 By the time the weekend of the open railroad had come and gone, the snow had melted off the platform, and something like two dozen youngsters had a chance to run the Hogwarts Express.  And in case you wondered, rubber Harry, Ron, and Hermione did get to fly over the castle. After imagining an elaborate setup suspending them like a mobile from tiny wires, I frankly ran out of time; so the night before the big event, I tried wooden skewers to find three that would fit snugly into the little holes that were already there and painted them black. (In retrospect, gray would have blended in better.) Then after we got almost everything else set up, I discovered that the big fold-out castle (#J5099) had little holes in some of the walls, presumably for flags or something. But the skewers fit right in, giving the magic trio a chance to soar above not only the castle, but also the heads of most of the kids running the train.  ConclusionI know there's not a lot of call for model castles in most hobbies, and the scale of these is too big for the rest. But it is a reminder to look past garish colors to see the proportions (or the "bones," if you prefer) of battered old toy buildings you see at flea markets, garage sales, and thrift shops to see if there's something that a new coat of paint and maybe new signage could convert into a useful model for your own little community - or kingdom.Your mileage will vary, of course. In the meantime, please keep in touch. Let me know if you have questions or suggestions or would like to subscribe to any of our newsletters. Appendix: More About Using Toy Trains OutsideSince this entire project was created to support a toy train, we're including links to other articles with tips and tricks about running battery-powered toy trains outside.
|

|
| Note: Family Garden TrainsTM, Garden Train StoreTM, Halloween TrainsTM, and Big Christmas TrainsTM are trademarks of Breakthrough Communications (www.btcomm.com). All information, data, text, and illustrations on this web site are
Copyright (c) 1999, 2000, 2001, 2002, 2003, 2004, 2005, 2006, 2007, 2008, 2009, 2010, 2011, 2012, 2013, 2014, 2015, 2016, 2017, 2018, 2019 by Paul D. Race. Reuse or republication without prior written permission is specifically forbidden. Halloween Trains(tm) is a participant in the Amazon Services LLC Associates Program, an affiliate advertising program designed to provide a means for sites to earn advertising fees by advertising and linking to amazon.com. For more information, please contact us. |
| Visit related pages and affiliated sites: | |||||
| - Trains and Hobbies - | |||||
 |  |
 |
 |
 |  |
 |

|

|  |
 |

|
| - Christmas Memories and Collectibles - | |||||
 |

|
 |

|
 |

|
| - Family Activities and Crafts - | |||||
 |

|

|

|

|

|
| - Music - | |||||

|
 |
 |

|

|

|

|

|

|

|

|

|

|

|

|

|

|

|